
One solution to manage your network, firewall, server, VM & etc
Zabbix is an open-source monitoring platform used to track the performance, health, and availability of IT systems.
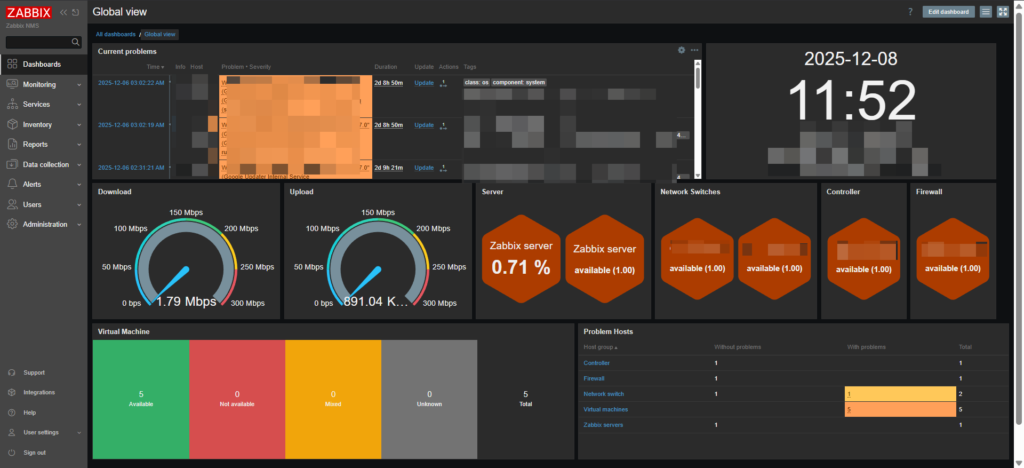
I kinda love Zabbix by the how it can modified or edit to show dashboard. It can either be use with SNMP v3 or agent to be monitored. I also configured it to sent to my telegram group to get notified what current happening to my infra. Zabbix Telegram Guide
Zabbix provide installation guide which you can find through their official website.
You can find Zabbix installation through this link Click Here To Enter Zabbix Installation
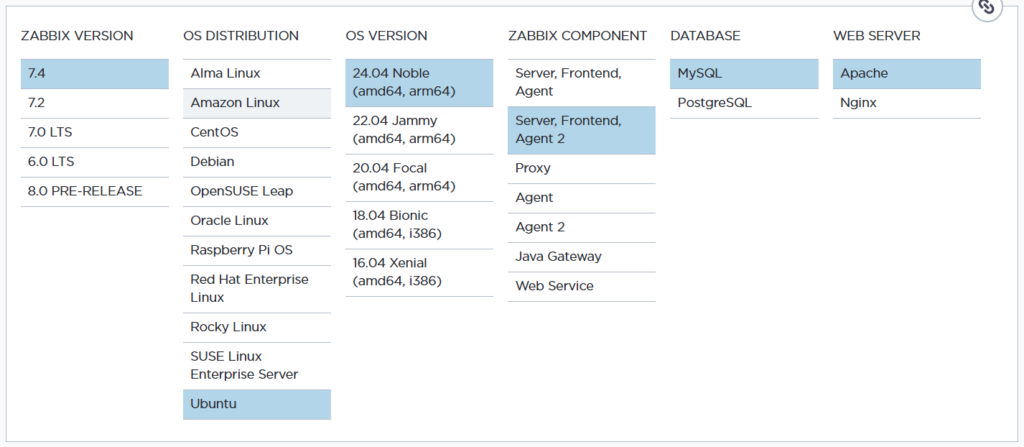
| a) Install and configure Zabbix for your platform | # wget https://repo.zabbix.com/zabbix/7.4/release/ubuntu/pool/main/z/zabbix-release/zabbix-release_latest_7.4+ubuntu24.04_all.deb # dpkg -i zabbix-release_latest_7.4+ubuntu24.04_all.deb # apt update |
| b) Install Zabbix server, frontend, agent2 | # apt install zabbix-server-mysql zabbix-frontend-php zabbix-apache-conf zabbix-sql-scripts zabbix-agent2 |
| c) Install Zabbix agent 2 plugins You may want to install Zabbix agent 2 plugins. | # apt install zabbix-agent2-plugin-mongodb zabbix-agent2-plugin-mssql zabbix-agent2-plugin-postgresql |
| Install mysql-server I found this need to be install to run create initial database | sudo apt install mysql-server |
| mysql-server secure installation (Zabbix will work even if you don’t run it.) this not necessary to configure Running it improves database security by: Setting root password Removing anonymous users Disabling remote root login Removing test database Reloading privileges | sudo mysql_secure_installation |
| d) Create initial database Run the following on your database host. | # mysql -uroot -p password mysql> create database zabbix character set utf8mb4 collate utf8mb4_bin; mysql> create user zabbix@localhost identified by ‘password’; mysql> grant all privileges on zabbix.* to zabbix@localhost; mysql> set global log_bin_trust_function_creators = 1; mysql> quit; |
| On Zabbix server host import initial schema and data. You will be prompted to enter your newly created password. | # zcat /usr/share/zabbix/sql-scripts/mysql/server.sql.gz | mysql --default-character-set=utf8mb4 -uzabbix -p zabbix |
| Disable log_bin_trust_function_creators option after importing database schema. | # mysql -uroot -p password mysql> set global log_bin_trust_function_creators = 0; mysql> quit; |
| e. Configure the database for Zabbix server Edit file /etc/zabbix/zabbix_server.conf | DBPassword=password |
| f. Start Zabbix server and agent processes Start Zabbix server and agent processes and make it start at system boot. | # systemctl restart zabbix-server zabbix-agent2 apache2 |
| g. Open Zabbix UI web page | The default URL for Zabbix UI when using Apache web server is http://host/zabbix |
Zabbix also offer a wide range of paid professional services that are designed to fit your unique business requirements.
Leave a Reply